
Supplies:
 Wire dress form: You can get these at a couple of different websites depending on the size you need.
Life size: Ballard Designs
Small Table Top Size: Stampington
We got our medium sized one here in town at Hobby Lobby.
White or cream fabric, enough to cover you wire dress form
Straight Pins
Hot Glue Gun
Glue Sticks
Pack of copy paper
We used 11 x 17 copy paper because of the size of our dress form. If you choose to make a smaller version 8.5 x 11 would be fine. If you make a larger version you may need to use the paper on a roll that can be found at any local arts and craft store.
Spray bottle filled with water
Scotch tape
Flower shapes in 6 or 7 sizes:The amount you need will depend on the size of your dress form. We used about 770 flower pieces for a total of 110 assembled flowers. Card stock paper will hold shape better, so we suggest using that rather than copy paper. Designs In Paper can supply you with the flower shapes or you can use punches found in the scrapbook department at your local craft store. You may want to check out the book Paper Bouquet for some great flower designs. The book also tells you what punches you need for the flower you wish to make.
Glue Dots: You can find them at any local craft store
Now let’s get started!!!
Wrap The Dress Form:
Wrap your wire dress form with the fabric and use the straight pins to secure the fabric to the form. The fabric is important to use if you want to use your dress form for other things and the glue will stick better to the fabric than it will to the metal wire.
Wrap The Dress Form:
Wrap your wire dress form with the fabric and use the straight pins to secure the fabric to the form. The fabric is important to use if you want to use your dress form for other things and the glue will stick better to the fabric than it will to the metal wire.
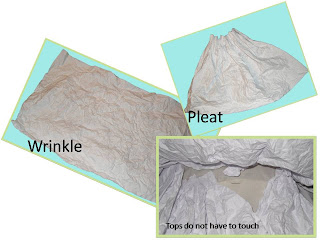
Create The Skirt:
Once your form is completely wrapped, you can start creating the skirt for the dress. Our skirt is made from the 11 x 17 sheets of paper. To create the wrinkled effect, spray one sheet of paper with the water and crumple into a ball, open it back up, and crumple and open it again. The water keeps the paper from tearing and it also helps the paper keep its shape once it dries. Now take the page and lay it on a table so that the long sides are at the top and bottom. Create pleats by just scrunching the top left corner and the top right corner to the center. You want to make the top so that it is about 4 inches wide once you pleat it (this length may vary depending on the size dress form you use). Once you are satisfied with the pleats use a piece of Scotch tape to keep the pleats in place. The side you place the Scotch tape on will be the side of paper that touches the dress form. Continue making these, stacking them one on top of another and cupping them so that the paper dries in a cupped shape. This will give your dress more fullness. Heat up your glue gun once these are dry. Apply glue to the Scotch taped area of the pleated paper. Be sure to get some glue on the tape and the paper and apply it to the fabric on the form. The top area of the skirt pieces do not have to touch each other. You can spread them out a bit as long as the next row up will cover the space. Start at the bottom of the skirt and work you way up the dress until you reach the area where you want the flowers to end.
Once your form is completely wrapped, you can start creating the skirt for the dress. Our skirt is made from the 11 x 17 sheets of paper. To create the wrinkled effect, spray one sheet of paper with the water and crumple into a ball, open it back up, and crumple and open it again. The water keeps the paper from tearing and it also helps the paper keep its shape once it dries. Now take the page and lay it on a table so that the long sides are at the top and bottom. Create pleats by just scrunching the top left corner and the top right corner to the center. You want to make the top so that it is about 4 inches wide once you pleat it (this length may vary depending on the size dress form you use). Once you are satisfied with the pleats use a piece of Scotch tape to keep the pleats in place. The side you place the Scotch tape on will be the side of paper that touches the dress form. Continue making these, stacking them one on top of another and cupping them so that the paper dries in a cupped shape. This will give your dress more fullness. Heat up your glue gun once these are dry. Apply glue to the Scotch taped area of the pleated paper. Be sure to get some glue on the tape and the paper and apply it to the fabric on the form. The top area of the skirt pieces do not have to touch each other. You can spread them out a bit as long as the next row up will cover the space. Start at the bottom of the skirt and work you way up the dress until you reach the area where you want the flowers to end.
 Shape The Flowers:
This is the longest part of the process so grab a friend or your fiancé to help. Your hands will thank you. To shape the flowers, start by separating them all by their size and put them in piles. Your smallest two sizes will be used as the centers and with be curled rather than folded. To curl them, hold the petal you want to curl with one hand and use your thumb nail to curl the paper. To do this, put the petal between your pointer finger and your thumb like you are going to pull off the petal. Instead of pulling the petal off run your thumb nail over the petal putting pressure on your pointer finger. This may take a try or two to get it right and you may, in fact, pull off a petal or ...10. The key is to keep a good hold on the base of the petal in your other hand. This will keep you from pulling off most of the petals. If you do pull off a petal its not a big deal. In the grand scheme of the arrangement, no one will notice. Use this process to curl both of the smallest flower sizes. For the rest of the flowers just fold the petals in half down the center of the petal. You don't have to crease them hard. The fold just helps to add dimension so you get a 3D flower.
 Assemble The Flowers:
You will want to make several sizes of finished flowers. Not only does this make the finished dress more appealing it also helps hide the backing fabric between large flowers. The basic formula for the finished flower is:
2 Extra Large Flowers
1 Large Flower
1 Medium Flower
2 Small Flowers
1 Extra Small Flower
No matter what size flower you are making the center will always be the, same small and extra small flower. The large and medium flowers will determine how large the finished flower will be. You can play around with your flowers and use whatever combination you like. To attach the flowers to one another, place the bottom of the flower to the glue dot, still on the roll, lift it up, the glue dot should now be attached. Place the flower on top of the other flower making sure that the petals of the top flower set in the spaces of the flower below it. This makes the flower full and looks more natural. Don't worry about being too perfect, Mother Nature isn't perfect.
Attach The Flowers:
This is the easy part. Make sure you have several sizes of flowers assembled. Begin gluing the flowers onto the dress using a dot of hot glue that fills up the round spot on the back of the flowers. Hold the flower in place once you have attached it to the fabric for a moment. This will let the glue set. Make sure you have your flower right where you want it because the glue does set up quick and it is very difficult to remove a flower if you need to move it. The best way to make sure that all the flowers fit together like a puzzle is to do one area at a time. Don't just place the large flowers all over then the medium and so on. This will make it hard to fill the gaps and hide the fabric underneath. Think of it as a puzzle and work all of the flowers together. We lined the inside top of our dress with flowers as well to hide the fabric from plain sight.
And now you have a beautiful paper wedding dress that you can use to decorate your Bridal Shower tables or even your favor/gift table at the wedding. We took our beautiful dress on a photo shoot. Isn't she pretty!


3 comments:
i LOVED the dress at the Bridal Show! It seems like a time-consuming project but the end result is so fabulous that it's totally worth it! :)
What a wonderful idea. I alter and have designed and made bridal gowns. So to see this done in paper is the neatest thing to me! I plan to do one of these just for fun!
Wow! That is a lot of work, but it looks amazing!
Post a Comment